As with any installation procedure, we advise you to always be mindful of safety precautions when handling materials and equipment.
Design
Where a new fence is being considered, we recommend at least three fence rails or a mix of fence rails and Kencote wires to give added height and density. In the case of an arena, we suggest that four or five fence rails be installed. Please note the section below on "Preparation of Fence Line for Horserail." To provide improved visibility and strength in an existing fence, it is a good idea to replace the top wires with fence rail. While laying out the fence line, we suggest that you stake the position of all ends, corners and gateways. Next, tension a string line or guide wire so that you can see how the land lays. Then, measure the distances carefully so that you or your installer have a clear understanding of the project and quantities of materials needed.
Preparation of Fence Line for Rail
Care should be exercised in preparing the fence line and the positioning of the line posts. (Try to avoid one post rise or one post dip). The tops of the posts should have a smooth, flowing line even if it means placing a rise post a little deeper or leaving a dip post higher. In extreme cases of undulating terrain, it is better to use a bulldozer to smooth the fence line, taking off the high spots and filling in the dips. Other options include fencing across the top of sharp dips and filling in later with boards or panels. The last, but more difficult choice, is to cut the top or bottom wire of the rail during the tensioning phase. Notch the web and carefully rejoin the wire with crimping sleeves. You can use a chain grab wire puller to assist at this time. The rail should then be stapled to the post again with the standard 2" (50mm) barbed staple or with a flat bracket. Please note that certain steep topography will make it very difficult to use the 4" (111mm) rail. Some installers limit the elevating change to 3 degrees per post.
Post Spacing
While this is largely up to the individual, factors to be considered are:
- livestock pressure
- topography
- firmness of soil and
- corral, arena and/or paddock size.
Installers have found that these factors have indicated a range of between 6 feet(2m) for more intense situations or where the line is curved, such as an arena, and up to 16 feet(5m) for larger in-sheltered areas. The more posts you use, the better it looks.
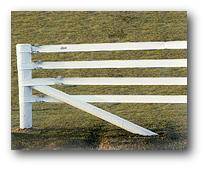
End Structures
Since the Horserail requires minimal tension to keep it flat and straight, (no excessive tension needed), a single end post with regular bracing is all that is necessary. Use as large an end post as possible, because it's the foundation of your fence. It also helps dwarf or hide the wire tensioners or tighteners.
Tensioning
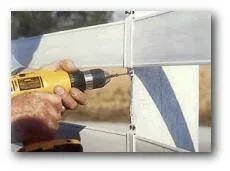
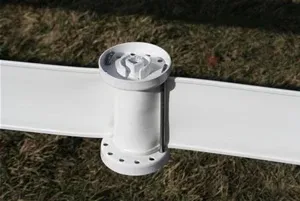
Spoolers are used to tension Horserail and reduce sag. We recommend that the rail be laid out rather than pulled out and that the rails are attached with the proper brackets to every 4th or 5th line post, BEFORE tensioning to the end posts. Install one spooler at the start and end of the fence, for each directional change and for every 33 ft of fence. When tensioning, be careful not to over-tighten and always pull towards you (do not push away from the spooler). Spoolers can be tensioned using a ratchet handle, but the Spooler Handle Set makes tensioning much faster, easier and ensures perfect alignment.
Horse Rail FAQ
Q: Can I build this myself? A: Yes, if you follow the directions we provide and have some practical experience, you can successfully build this fence. It may take you a little while to complete, but like anything else, with more experience you become more proficient and faster. Try to learn as much as you can before starting the project. Also, you might consider using the services of a professional installer to drive or set the posts, leaving you to finish the rail.
Q: How long will it last? A: We use a large plastic supplier who blends in a 20+ year UV stabilization package in the premium grade polyethylene plastic we buy, and we stand behind their products. Because of this we offer a twelve year limited warranty (and ten years on other products), knowing that polyethylene will usually outperform PVC.
Q: What post-spacing can I use? A: This is a personal choice, but, consider the amount of animal pressure. The more pressure there will be, the closer you want the posts. Heavy usage, lots etc. 6-foot; corrals 8-foot; small paddocks 10-foot; larger paddocks 12-14-foot post centers. Fences on 16-foot centers in exposed areas may have problems because crosswind will cause the rail to vibrate. So, 16-foot post centers is maximum, if used in sheltered areas. i.e. against a tree row or in a hollow.
Q: Should I consider a professional installer? A: Qualified installers have the equipment, tools and experience to give you a permanent, professional looking structure. For every dollar you spend, it will be returned in increased equity by adding value to your property. If you have never built a fence like this, consider having a fencing contractor quote and install the first section of fence, so that you might be able to watch him. Then you can make an evaluation as to whether you finish the installation or have him do it.
Q: Will my horses crib on the rail? A: Horses have been known to bite or crib, but not excessively. They may bite on it, but only to the wire then they will stop. It is not a continuing habit.
Q: Should I loosen the fence for the winter? A: In most situations no, but areas where you have extreme temperatures, it will allow the fence to last longer.
Q: Can I use steel tee posts? A: It is not recommended, because there is no satisfactory method of attaching the rail to the post while allowing it to slide.
Q: Can I electrify the rail? A: No, electricity will not come through the rail, but you can use the wire in the rail to carry the pulsating charge. This is sometimes done for security, or to stop cribbing. Remember to attach electric fence warning signs.
Q: Should I use electric with the fence? A: Most fence owners like to have either a poly-wire, or a single hot wire near the top of the fence, so that it might be used as an education tool to stop horses from riding the fence line. Use only on an "as needed basis".
Q: How long can I make the fence? A: Most installations are from end to end on straight runs, regardless of the length, you can pull around corners if it is a short run of 100 feet or so. It is reasonably easy to join one roll of rail to another with crimping sleeves.
Q: Do I have to use tensioners at both ends of the fence? A: Yes, tensioners are used as a method of attachment, as well as for tensioning. It is the end post assemblies that move and slacken the fence, so with the tensioners there, it is easy to re-tighten. Its less advisable to place tensioners in the middle of the fence span when using coated wire or rail products.
Q: Is there any technical help available? A: We can answer most questions that you might have, and if we can't answer it ourselves, we know who can. Please e-mail or call for help.
Q: What will this fence cost me? A: About the same as a board fence in cash outlay, however when the annual maintenance cost is taken into account, the rail fence is less expensive. (It's the safety factor that is difficult to place a value on when it comes to the safety of your animals. Veterinary services can be expensive.)
Q: Why do you think your product is better than the other companies? A: We asked the same question to contractors who have handled other products and they prefer ours. Horserail is the number one choice of contractors because it looks great, lasts long, and most importantly, it is easy to handle during installation. Please check it out for yourself.