Orders over $99 may qualify for free shipping.
Using a Crimp Tool for Fence Wire Connections
Using a crimping tool is one of the most effective ways to make strong, permanent wire joins on an electric fence. Whether you’re building a new high-tensile fence or making repairs in the field, crimp sleeves offer a secure connection that maintains the integrity and conductivity of your wire. But to achieve professional results, proper technique matters.
This guide explains how to use a crimp tool correctly, avoid common mistakes, adjust the tool when needed, and ensure long-term performance. Following these simple but important steps will help you get the most out of your fencing system.
Why Use a Crimp Tool?
Crimping is one of the strongest ways to join fence wire. Unlike twisting or knotting, crimp sleeves grip the wire uniformly and retain nearly the full breaking strength of the wire. Crimped connections are also neater, easier to inspect, and reduce the risk of power loss from poor contact.
They’re especially important in high-tensile fencing where tight joins and consistent conductivity are critical for fence performance. With the right sleeves and crimp tool, you can create strong, secure connections in minutes.
Correct Sleeve Placement
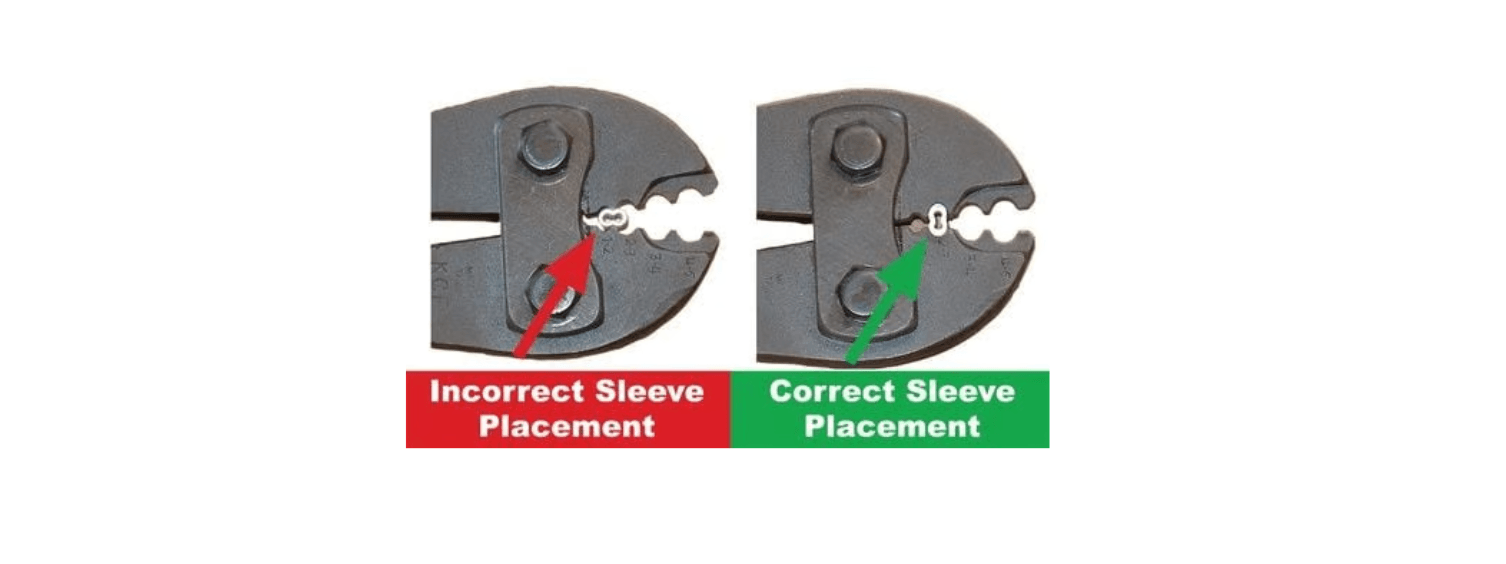
One of the most common mistakes when crimping is incorrect sleeve positioning in the tool. The sleeve should be placed into the appropriate slot in the crimp tool and compressed into a cylindrical shape. Do not split the sleeve into an “8” shape — this reduces strength and can lead to failure over time.
When using more than one sleeve for a longer join, leave ¼ inch of space between sleeves. This allows for proper expansion and prevents the sleeves from cracking or binding against each other when the wire is under tension.

Proper Crimping Technique
Crimping is not just about squeezing the tool. Before you begin, ensure the wires are inserted fully into the sleeve and pushed tightly together. When compressed, the sleeve should form a clean cylinder around both wires.
Use smooth, steady pressure on the crimp handles. Most crimp tools are designed to work with little effort when aligned correctly. Make sure the tool fully closes around the sleeve and completes the crimp. For best results, work on a solid surface or stable fence post where you can maintain leverage.
This technique creates a join that is both strong and conductive, minimizing the chance of wire breaks or electrical loss.

Tool Adjustment and Maintenance
Crimp tools are typically pre-adjusted at the factory and ready to use. However, after extended use, the tool may need fine-tuning to maintain crimp quality. Most crimp tools include a gauge to help you verify crimp accuracy. After completing a crimp, slide the gauge over the pressed portion of the sleeve. If it doesn’t fit, adjustment is likely needed.
To adjust:
- Open the tool and use an Allen wrench to loosen the locking screw.
- Turn the adjustment screw clockwise about ¼ turn.
- Make another crimp, test with the gauge, and repeat if necessary.
- Once the crimp fits the gauge properly, retighten the locking screw.
Also, be sure to clean and oil the tool regularly to keep it working smoothly. Dirt and debris in the jaws can affect crimp quality. After crimping, "empty" the tool occasionally to relieve spring tension and ensure proper function. This is especially helpful if your tool is used frequently or in harsh outdoor conditions.
Sleeve Compatibility
Always use the right sleeves for your crimping tool. Most standard tools are compatible with sleeve sizes like C23, C25S, C12, and C12AL. These sleeves are designed to fit tightly over 12½ or 10 gauge wire and provide excellent conductivity and strength.
Before starting a job, double-check that your sleeve fits the guide or reference chart included with your tool. Using the wrong sleeve type can lead to poor crimps, wire slippage, or failed joins under pressure.
Practical Tips for Best Results
- Store your sleeves in a dry, clean container to prevent corrosion.
- Use galvanized or aluminum sleeves based on the wire material.
- Don’t reuse sleeves — once crimped, they should not be opened or adjusted.
- Mark your tool and sleeves if you're using different wire gauges to avoid mix-ups in the field.
Conclusion
A crimp tool is one of the most valuable tools in electric fence construction. When used correctly, it allows you to create strong, secure joins that won’t come loose over time. Whether you're joining high-tensile wire, repairing broken lines, or terminating ends at posts, proper sleeve placement and tool care make all the difference.
Taking a few minutes to follow the correct technique ensures the job is done right the first time. Keep this guide on hand whenever you’re working with crimp sleeves — it’s a small step that leads to a stronger, longer-lasting fence.