Free Shipping on qualified items.
Click here for more details


BLOG
Repairing Your High-Tensile Fence

Repairing your high-tensile electric fence can be complicated. Luckily, Kencove is here to help. With a few tools and supplies, your fence will be ready for spring calves, grazing sheep, or happy horses. Ideally, you want to read 6,000 to 8,000 volts or more on your fence. In our previous blog we detailed a quick list of products you will need to make major or minor fence repairs. You also need to identify the parts of your fence that are in need of a tune up. Some popular repairs are cracked insulators, sagging wire, broken wire, and a loss of voltage. Once you make your repairs, your voltage should come back. If not, we will walk you through some quick troubleshooting to identify where you are losing your voltage.
The first step is to check your insulators. Repairing a cracked or broken insulator can be time consuming and daunting. However, with Kencove’s ingenious Spiralator insulator, you can quickly simplify this process. Check out this video on how to install a Spiralator.
Once you have replaced any cracked or missing insulators, check your fence voltage again to see if you have addressed all the faults along your fence. If you have not reached your desired voltage, and suspect another fault along your fence, check your connections.
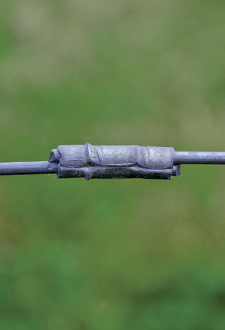
Start by checking anywhere you have a crimp. Check for rust or other signs of weak wire such as scratched galvanization or bent wire. If you see an area of rusty or damaged wire, remove that section of wire and replace it with new wire of the same gauge. You can accomplish this with a few crimps and a crimp tool. Depending on the gauge of wire you are using, you will need to select the proper crimp sleeves. Use 2-3 sleeves per splice, or one long sleeve.

After repairing your damaged wire, test your fence again. If you are still experiencing a loss of voltage, it’s time to check your underground wire and electrical connections.
Typical underground wires become damaged rather quickly if they are left unprotected in heavy-traffic areas. The best way to install underground wire in these areas is by using some type of conduit. You will want to avoid water laying in this conduit, so seal it up as best you can.
Test your voltage on either side of all underground wires. If you see a drop in voltage on either side of your gate, it’s safe to say you need to replace this portion of your electrical system. You will need new underground wire and a few split bolts or open tap crimps to fix this common issue. Start by removing the current underground wire. If possible, try adding some type of pipe or conduit to protect and prolong the life of your new underground wire. Cut your new piece of underground wire and use split bolts to connect the energy back to either side of the gate, or use a simple open tap crimp sleeve to complete the energy circuit.
Test your fence again to see if you have corrected all your faults. If you are still reading a low voltage, try testing your ground bed.
You want to read under 2,000 volts on your ground rods. Start by turning your energizer off. Next, simply “short out” your fence by leaning a metal rod or post against your fence. Turn your energizer back on, and test your ground bed by testing the last rod in your series of ground rods. If you are reading over 2,000 volts, keep adding additional ground rods 10 feet apart until you drop below 2,000 volts. Remember:
- There is no such thing as too many ground rods
- Ground rods need to be at least 10 feet apart
- Ground rods can be anywhere along your fence line. They don’t need to be right next to your energizer.
- Ground beds need to be at least 50 feet away from existing ground beds, underground wires, other pipes, and utility lines.
If you still aren’t getting your desired voltage of 6,000-8,000+ volts on your fence…well, you tried…better build a new fence! Just kidding, there are still more places to check.
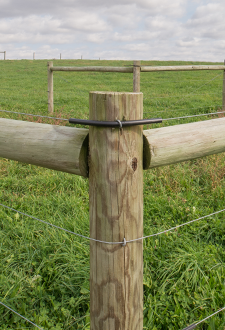
Try checking your brace wires to see if your hot wires are coming into contact with your non-insulated brace wire. If they are, you can use something simple like an old garden hose or a coil of Kencove’s Spiralator to insulate these wires. You will want to insulate any wire that is touching or close to touching your hot wires. With the contact of these hot to not-insulated wires, you are sending your voltage straight to the ground, grounding out your fence system.
You should also check your gates. If you are using spring or bungy gates, make sure your gate handle isn’t cracked or broken. This will prevent unwanted zaps, and help improve the voltage along your fence line. If your gate handle is cracked, it may be transferring voltage to your post, creating a short in your fence. You may also need to replace your springs or bungy if they are over-stretched or twisted beyond repair.
Another common issue is caused from over sizing your energizer. If you have an extremely large energizer (high output joules) and a short fence, you are setting yourself up for induction. Induction is “the process by which an electrical conductor becomes electrified when near a charged body, by which a magnetizable body becomes magnetized when in a magnetic field or in the magnetic flux set up by a magnetomotive force, or by which an electromotive force is produced in a circuit by varying the magnetic field linked with the circuit.[1]”
In fence terms, induction is when energy jumps from your intended hot wires to things you do not want hot, such as gates or non-insulated wires.
You can overcome induction by adding additional ground rods, checking to see if your energizer has a half power setting, or insulating areas where the extra energy is traveling such as gates or non-insulated wires.
If you are still not getting the ideal voltage, you may have too small of an energizer. We recommend one output joule per mile of fence (regardless of the number of strands). If your energizer gives you a “miles or acres” rating and not an output-joule rating, try checking your manual to find its true output-joule rating. If your energizer is undersized, you may see a drop in voltage down your fence line, even though your energizer is reading high at the start of your fence. For help on finding a properly sized energizer, check out our blog Bigger Isn’t Always Better, or give our product specialists a call at 1-800-KENCOVE.

Other steps to take in preparing your high-tensile electric fence include checking the tension on your wires. If you notice wires are sagging, you will need to tighten them using either a Gripple tensioner or a strainer. One of these tensioners should be installed on your fence. To add more tension, simply use either a Gripple Torque Tool for Gripples or a handle for your strainer. Once you have added tension to your fence, check your staples to ensure they are not too tight or too loose. Also double-check that your insulators are properly installed and protecting your hot wires.
You should also check to make sure your electric fence signs are legible. Depending on your state and local laws, sign requirements will vary. For the safety of others, and your own protection, make sure warning signs are visible in high-traffic areas.
Last but not least, don’t forget to keep records of all repairs! This will help you in isolating future problem areas, as well as provide you with a list of products you have used. Keeping a small notebook near your energizer is helpful in recording your typical fence voltage in various places, which makes testing a breeze the next time you are trying to identify your fault.
If you need any help repairing your fence or finding the fault in your fence, give us a call at 1-800-KENCOVE. We are eager to help with fence repairs, and we’d rather help you now than when your cows are already eating your neighbor’s prized roses. But don’t worry, we’ll still help you then too!