There's a moment every new homesteader hits — standing in the middle of an open field, animals waiting, and the sudden realization that a fence isn't just wire strung between sticks. It's a system. And if you get it wrong, your animals will let you know.
The good news? Fencing your first pasture isn't complicated. It just requires understanding the right steps, in the right order, with the right materials for your situation. This guide walks you through everything — from planning your layout to testing your finished fence — so you can get it done right the first time.
Step 1: Plan Before You Buy
The single most common beginner mistake is buying materials before making a plan. A few hours of planning will save you significant time, money, and frustration.
Map your fence line. Walk the perimeter of the area you want to fence and measure it. Note any obstacles — trees, water sources, gates, terrain changes. Kencove's free Fence Builder tool lets you map your fence line on a satellite view of your property, calculate your total linear footage, and build a materials list automatically — all before you buy a single post. Know your total linear footage before you order anything.
Decide what you're containing — or excluding. Your animal determines your fence. Cattle need something different than goats. Horses need something different than poultry. Every decision that follows — wire type, post spacing, whether you need electric — flows from this.
Identify your corner and gate locations. Corner assemblies are the structural backbone of your fence. Gate placement determines how you'll move animals and equipment every day for the life of your farm. Think carefully about both before you start.
Step 2: Set Your Corner & Brace Posts
Every fence starts at a corner. Get this right and everything that follows is straightforward. Rush it and you'll be fighting your fence for years.
Corner posts take the full tension load of your fence line. They need to be larger, deeper, and more solidly set than your line posts — typically 6–8 inch diameter wood posts set at least 3.5 feet deep, or deeper in loose soil.
A proper H-brace assembly connects your corner post to a secondary brace post, distributing the load and preventing lean. This is non-negotiable for any fence under tension. A corner post without a brace is a corner post waiting to fail.
What you need:
- Heavy wood corner posts
- H-brace assemblies
- Brace tighteners
- Fast-setting concrete (for corner posts)
Beginner tip: Set corner posts in concrete. Line posts can be driven directly into the ground, but corners take too much force to rely on soil alone.
Step 3: Drive Your Line Posts
Line posts run between corners and support your wire. This is the most physically demanding part of the job — and the most satisfying when you get into a rhythm.
T-posts are the most beginner-friendly option. They drive quickly, hold wire securely, and are forgiving if you're not perfectly straight — you can adjust a T-post after driving in a way you can't with concrete. For most beginner pasture applications, T-posts are the right call.
Post spacing depends on your fence type and terrain:
- Woven wire fencing: 8–12 feet apart
- High-tensile electric: 15–20 feet apart (with step-in posts between on long runs)
- Hilly or uneven terrain: closer spacing to keep wire in contact with the ground
What you need:
Beginner tip: Use a string line between your corners to keep your posts in alignment. It takes five minutes to set up and saves you from a fence that wanders.
Step 4: Choose Your Wire
This is the decision that trips up most beginners. There are dozens of wire options — and the right one depends entirely on what you're raising.
Woven Wire (Field Fence)
The most versatile option for beginners. A physical barrier that doesn't require electricity, woven wire works for cattle, sheep, pigs, and most mixed-use situations. Choose the mesh opening based on your animal — larger openings for cattle, smaller for sheep and goats.
- Best for: Cattle, sheep, pigs, mixed livestock
- Key feature: No electricity required — fully mechanical
- Shop Woven Wire
High-Tensile Wire
Strong, long-lasting, and low-maintenance once properly tensioned. High-tensile is used for both non-electric perimeter fences and electric systems. Requires proper corner assemblies and tensioning equipment.
- Best for: Cattle, horses, large perimeter fences
- Key feature: Lasts decades when properly installed
- Shop High-Tensile Wire
Polywire & Polytape
Lightweight, portable, and easy to install and move. The go-to choice for rotational grazing, temporary paddocks, and cross-fencing. Must be used with an energizer.
- Best for: Rotational grazing, temporary divisions, horses (tape)
- Key feature: Set up in an afternoon, move in minutes
- Shop Polywire
Beginner tip: Match your wire to your animal. Goats will test every inch of a fence — use a woven wire with small enough openings that they can't get their head through. Horses need high-visibility wire or tape so they can see the fence and won't run through it.
Step 5: Stretch & Attach Your Wire
Tension is what separates a fence that lasts from one that sags, droops, and eventually fails. This step is where most beginner fences go wrong.
Start by unrolling your wire along the fence line, then attach one end to your corner post. Use a fence stretcher to pull the wire tight before attaching it to line posts — never attach wire to posts first and try to tighten it afterward. Work from corner to corner, one section at a time.
For woven wire, use fence staples to attach wire to wood posts and T-post clips to attach to T-posts. Staple every 12–18 inches on corner posts, and at every line post.
What you need:
Beginner tip: Proper tension means the wire springs back when you push it. Loose wire is not a fence — it's an inconvenience your animals will eventually push through.
Step 6: Set Up Your Electric System (If Applicable)
If you're using any form of electric fencing — even a single hot wire on top of a woven wire fence — you need four components: an energizer, insulators, ground rods, and a way to test it.
Energizer
The energizer is the heart of your electric fence. It converts power into high-voltage pulses that run through your wire. Choosing the right one depends on your power source and your total fence length.
- Plug-in energizers: Most powerful and reliable — use when you have access to an outlet near your fence
- Solar energizers: Great for remote pastures with no power access
- Battery energizers: Best for temporary or portable setups
Size up. A more powerful energizer running a short fence is far better than an undersized one struggling to maintain voltage across a long run. As a rule of thumb, buy more joules than you think you need — you can always add fence later.
Insulators
Insulators keep your electric wire separated from posts and any grounded surface. Every post needs one — skip insulators and your wire contacts the post, sends voltage to ground, and your fence stops working.
Ground Rods
The most overlooked component in electric fencing — and the most important. Without a proper ground, your energizer has nowhere to complete its circuit and your fence won't shock effectively regardless of how much power you're pushing.
The general rule: 3 feet of ground rod per joule of energizer output, with rods spaced at least 10 feet apart. Most beginners under-ground significantly.
Fence Tester / Voltmeter
How do you know if your electric fence is working? You test it — at multiple points along the line, not just at the energizer. A fence tester is inexpensive and tells you exactly where you're losing voltage.
Beginner tip: Test your fence before your animals go in, and again after the first week. Animals push on new fences — if there's a weak spot, you want to find it first.
Step 7: Hang Your Gates
Gates are often an afterthought — planned last, hung quickly, and then used every single day for the life of the farm. Spend a little extra time getting them right.
Consider placement carefully. Think about where you'll move animals most frequently, where you need vehicle or equipment access, and where you walk daily. A gate in the wrong place becomes a permanent frustration.
For electric fences, use an electric gate handle or spring gate kit to carry voltage across the opening. A gate that breaks your electric circuit creates a dead zone in your fence.
What you need:
Step 8: Test Before You Turn Animals Out
Before a single animal sets foot in your new pasture, walk the entire fence line one final time.
- Push on posts — anything that moves needs to be re-driven or reset
- Check wire tension — push each strand and make sure it springs back
- For electric fences: test voltage at multiple points with your fence tester
- Check gate latches and hinges
- Look for any gaps at ground level, especially in corners
The test that matters most: If you're not confident your fence would hold, your animals aren't going in yet. A fence that fails on day one is a fence you'll be repairing — and chasing animals — for a long time.
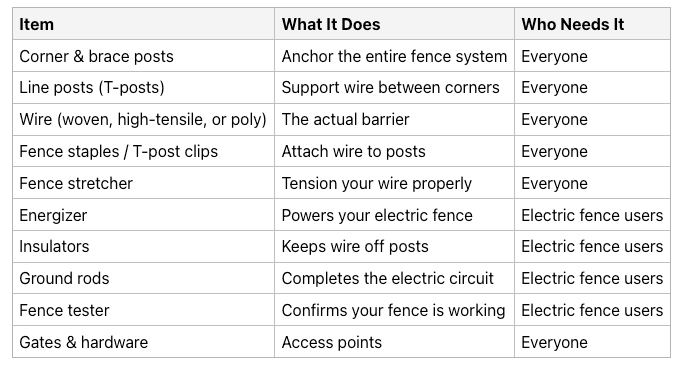
Quick Reference: What You Need for Your First Fence
Ready to Get Started?
Kencove has been helping first-time homesteaders and experienced farmers build better fences for over 40 years. If you're not sure what you need for your specific situation — your animal, your acreage, your terrain — our team is ready to help.
Shop the Beginner Fencing Collection at portal.kencove.com/beginner →