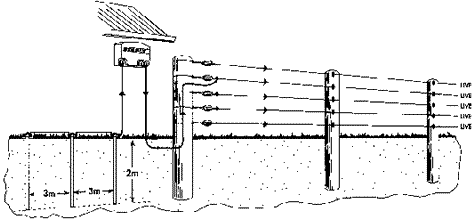
ENERGIZER INSTALLATION
MAINS POWERED ENERGIZERS
Mains energizers should be installed by mounting
on a wall, under cover and out of the reach of children. It is also
advisable to mount the energizer in a position where it is less likely
to be damaged by machinery and away from flammable materials. All
Stafix energizers are supplied with detailed mounting instructions,
which should be read before installation.
Once
the energizer has been mounted, connect the ground system to the
green ground terminal marked by the symbol . Correct grounding is
important. Connect the red terminal (or yellow 1/2 voltage terminal)
to the fence line with leadout cable. See FENCE CONSTRUCTION for
more information on leadouts.
BATTERY POWERED ENERGIZERS Battery
energizers should be mounted on a post or stand which is not accessible
to the animals. Connect the red (positive +) clip to the positive
battery terminal and the black (negative -) clip to the negative
battery terminal. As with mains energizers, you require a good ground
system. Install a good ground close to the energizer and connect
this to the green ground terminal on the energizer. Connect the
red power terminal to the fence line.
Battery energizers which run off internal
dry cell batteries e.g. Strip grazers, can be connected directly
to the fence wire. For best results push an ground rod into the
earth and connect to the ground terminal on the energizer. If there
is insufficient power at the end of the fence line, position the
energizer in the center of the fence line.
SOLAR POWERED ENERGIZERS Solar powered energizers should be positioned near the center of
the fence line, away from shadow or animal contact. In the southern
hemisphere face the panels north and in the northern hemisphere
face the panels south. The panels should be set at an angle that
maximizes the sunâs rays; this will vary depending on the latitude.
As a general rule, solar panels should be set with a tilt angle
equal to the latitude plus 10% or 15%. For the maximum efficiency
it may be necessary to adjust the tilt angle of the panels at different
times of the year.
Having the panels on an angle also assists
in keeping the panels clean, but the panel should still be cleaned
frequently. In New Zealand set the angle at approximately 45 degrees.
- Never set a panel horizontally.
- Solar panels should be bolted to a mounting
post which holds the panel firmly in the correct position.
- Keep the energizer, battery and solar
panel as close together as is practical.
Connect the panel to the battery and then the Energizer to the
battery.
- Do not connect the energizer directly
to the panel.
- Keep the energizer and the battery under
cover and out of the weather if possible.
Install a good ground system.
GROUNDING
Grounding is the most important component of any electric fence
system. Over 80% of all electric fence problems are attributable
to poor grounding. It is important to understand how and why you
need to install an effective ground system. For an electric fence
to be effective a circuit must be completed. When an animal touches
the fence, the circuit is completed through the ground, or earth
wires, and the current flows back via the ground rods to the energizer.
There are two recommended grounding systems.
GROUND EARTH RETURN This system has all the
fence wires "live" and the circuit is completed when the
animal touches the wire and the electrons flow through it to the
ground. This system is recommended when soil conductivity is good.
INSTALLATION Choose a site which is damp
all year round. (The site can be some distance from the Energizer
itself).
This site should be:
- At least 33ft from other electrical earths
or telephone cables. (In fact, 330ft is best although this is
not always possible).
- Not connected to sheds or concrete footings
which are poor grounds.
Protected from stock and machinery.
- Drive a minimum of three 6'6" galvanized
or copper earth rods into the ground. For large energizers and
dry sandy soils extra earth rods may be required. Place the ground
rods at least 9'9" apart.
- Connect all the ground rods together
with one continuous wire (use insulated 12½ gauge cable)
and clamp to the ground rods.
- Good grounding around dairy sheds is
very important as cattle are particularly sensitive to stray voltage.
Note: Do not connect two
or more energizers to the same ground system.
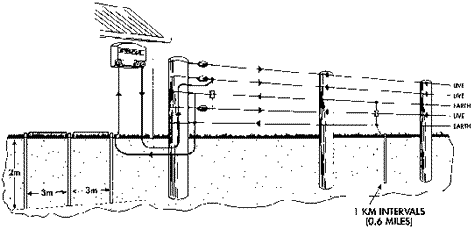
FENCE EARTH RETURN
This system has alternate "live" and ground (neutral)
wires. The circuit is completed when the animal touches both of
these wires at the same time. The electrons flow through both the
ground and down the ground wires. This system is recommended when
the soil conductivity is poor.
INSTALLATION
This system requires two grounds; the main
or primary ground and secondary grounds.
The main or primary ground is set up as described in GROUND EARTH
RETURN.
To install the secondary grounds, drive the ground rods along the
fence line at approximately 0.6 mile intervals. These are connected
in parallel to the ground (neutral) wires on the fence. This helps
reduce induction and improves the effectiveness of the main ground.
Connect the ground (neutral) wires on the fence to the main ground
using insulated cable.
When installing cable under gateways remember to run a cable for
the ground (neutral) wires.
BENTONITE GROUND SYSTEMS In particularly dry areas,
a Bentonite ground system is recommended. Mix 10 lbs of Bentonite
and 5 lbs of coarse salt into a slurry. Dig a hole which is 4ft
deep and 3" in diameter. Place a Stainless Steel ground rod
into the hole and pour in the slurry. Connect the ground system
to the energizer in the same manner as previously described.
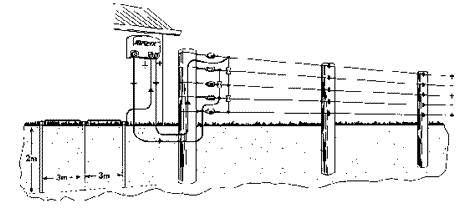
BI-POLAR FENCING
The Bi Polar fence system works by sending out two simultaneous
pulses of energy down the fence line; one pulse is negative in respect
to ground, the other pulse is positive in respect to ground. When
installed, the energizer passes half its output voltage on to the
negative charged wire and half its output voltage on to the positive
charge wire.
In a Bi Polar fencing system each wire is
insulated, in the same fashion as they are in a ground earth return
system. The major difference being that when the wires are joined
in parallel, they are joined to form two different circuits; a negative
pulsed circuit and a positive pulsed circuit. The system requires
two leadouts from the energizer; one for the circuit that will be
negatively pulsed and one for the circuit that will be positively
pulsed.
Note: The Stafix battery range of energizers
cannot be used in Bi-Polar Fence System.
Using the Bi-Polar system, an animal can
receive a shock by:
- Making contact with the positive or the
negative charged wires, thus completing the circuit through the
ground.
- Making contact with a positive and negative
charged wire simultaneously.
Setting up a Stafix Mains Energizer in a Bi-Polar system Install
the Mains Energizer on a wall, undercover and out of the reach
of children. Install a ground earth system.
- Connect the insulated cable from the ground
system to the half power terminal (yellow) on the energizer.
- Connect the leadout from the negative
pulsed wires to the ground terminal (green) on the energizer.
- Connect the leadout from the positive
pulsed wires to the full power terminal (red) on the energizer.
TESTING YOUR GROUND
If your fence is not giving the shock you expect, it is most likely
to be your ground system. Always check the ground first. The ground
is half the effective circuit in an electric fence system.
The main causes of an ineffective ground
are:
- Insufficient ground rods.
- Badly connected wires, or wires of different
metal types joined together.
- Poor connections to the ground rods.
- Ground rods too close together.
- Ground rods not long enough.
- Depth is important to good earthing as
it ensures that part of the ground rod is always in damp soil.
TESTING YOUR GROUND EARTH RETURN
Create a dead short by placing enough steel
stakes against the fence line to reduce the voltage to 1000 volts
or less. These stakes should be at least 330ft from the ground system.
Connect one clip from your Stafix Digital Voltmeter to the last
ground rod. Connect the other clip to a small stake placed in the
ground at least 3ft from any other ground rods.
The reading on the Voltmeter should be 0.3 kV or less. If it is
greater than this, the ground system is inadequate and more ground
rods will need to be added.
TESTING YOUR FENCE
EARTH RETURN
Do this test as close as possible to the
end of the fence line.
Place a steel rod or stake at least 1ft into the ground, preferably
into damp soil.
Measure the voltage between the ground wires and live wires on the
fence and then between the steel rod and the live wires.
The voltage between the ground stake and live wire should not be
more than 0.3kV greater than the voltage between the live and ground
wire.
If the difference is greater than 0.3 kV then check the ground return
wire for loose connections. Also remember to check the live wires.
If the live wires are alright you will need to add more ground rods
along the fence line and attach these to the ground wires.
LIGHTNING PROTECTION
Lightning can cause serious damage to your energizer. When lightning
strikes close to (or directly on) an electric fence, it causes a
massive surge in voltage which flows back to your energizer to find
the quickest path to earth.
The only fail safe method to avoid damage
occurring to your energizer during an electrical storm is to disconnect
it from the fence line and from the mains power supply. For safety
reasons, never disconnect the energizer during an electrical storm.
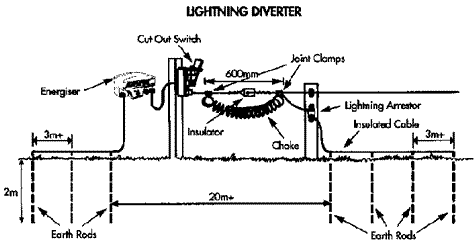
A practical alternative to this is to install
a Stafix Lightning Diverter Kit. The kit contains all the components
needed including a choke. The choke creates a blocking effect for
the extremely high voltages caused by lightning. The voltage is
blocked by the choke and diverted across the arrestor to earth.
The ground system on the lightning arrestor must be as good as,
or better than, the ground system for the energizer.
For the best possible protection install
the Lightning Diverter as close as possible to the energizer. This
can either be in the leadout or in the first section of fence line.
Full instructions are supplied with each kit but the diagram below
depicts a typical setup.

|