Resources
Horizontal Grid Trellis (Fruit Trees and Grapes)
This is one of the largest trellises that can be built with high-tensile wire. It is a series of interconnected one-wire vertical trellises providing maximum sunlight exposure. The entire grid is 6.5 ft above ground for hand-picking several types of fruit. For pruning fruit trees, a worker wearing snowshoes can walk the grid.
Pears, apples, kiwifruit and grapes can be grown on this trellis. However, because of different training patterns and fruit loads, post spacing, driving depths and wire spacing vary. This section describes the construction of a grid trellis for pears. For post and wire variables that apply to other types of fruit and grapes, see Table 9 below. Bear in mind plant spacing will also affect post and wire placement. Besides supporting the grid wires, internal posts are used to train trees or vines.
Another design of this trellis uses diagonal wires suspended from tall central poles to support the grid (See page 46).
NOTE: See "BASIC METHODS OF CONSTRUCTION".
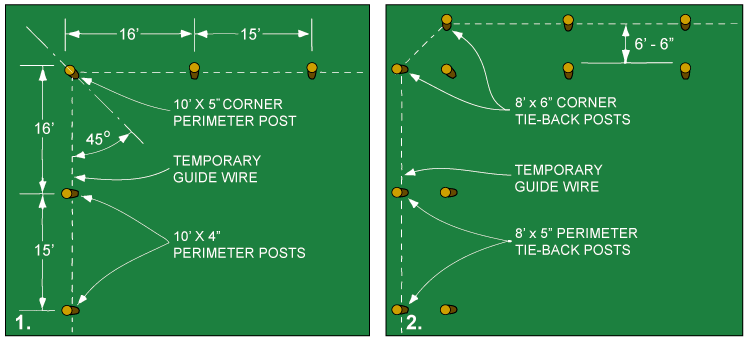
- First, drive the four corner perimeter posts. Before driving, each 10' x 5" post should be leaned 17 inches off vertical outward along a line that bisects the 90° corner shown in Drawing 1. Each post is driven 3 feet.
- String a temporary guide wire around the outsides of the four corner posts, just above ground. Use a Wire Puller to tension the guide wire to 150 pounds.
- Drive the remaining 10'x4" perimeter posts 15 ft. on centers, and leaning 12 inches outward off vertical (at the 6 1/2' level) before driving. Each post is driven 3'-3".
- Drive two 8' x 6" tie-back posts 6 1/2 feet outside each corner (see Drawing 2). Tie-back posts should be driven with the same lean as the corner posts, to a depth of 5'.
- Reposition the temporary guide wire to the outside of the corner tie-back posts, and tension to 150 pounds.
- Drive the remaining 8' x 5" tie-back posts 6 1/2 feet outside each perimeter post.
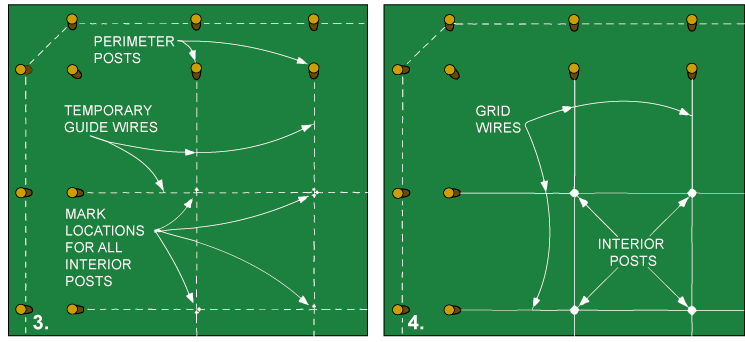
NOTE: All tie-back posts are leaned in the same direction and at the same angle as the perimeter posts (12 inches off vertical at the 8' level). - String temporary guide wires between all opposite perimeter posts (Drawing 3). Position all guide wires slightly above ground. Loop one end of each wire around a perimeter post, and crimp with a Sleeve. Fasten the other end of the wire to the opposite perimeter post with an In-Line Wire Strainer (see Method 2 on page 12).
- Mark locations of interior posts with lime or spray paint at all wire intersections.
- Drive interior posts vertically into the ground at each location marked for intersecting wires (Drawing 4). Exactly 6 1/2 feet of post must be above ground (9' post driven 2 1/2 ft. or a 10' post driven 3 1/2').
- Relieve tension on all guide wires between perimeter posts, and lift them to 3 inches beneath the tops of the perimeter posts (which should be 6'9" - measured vertically - above ground). These wires now become the grid wires, and should be 6 1/2 feet above ground.
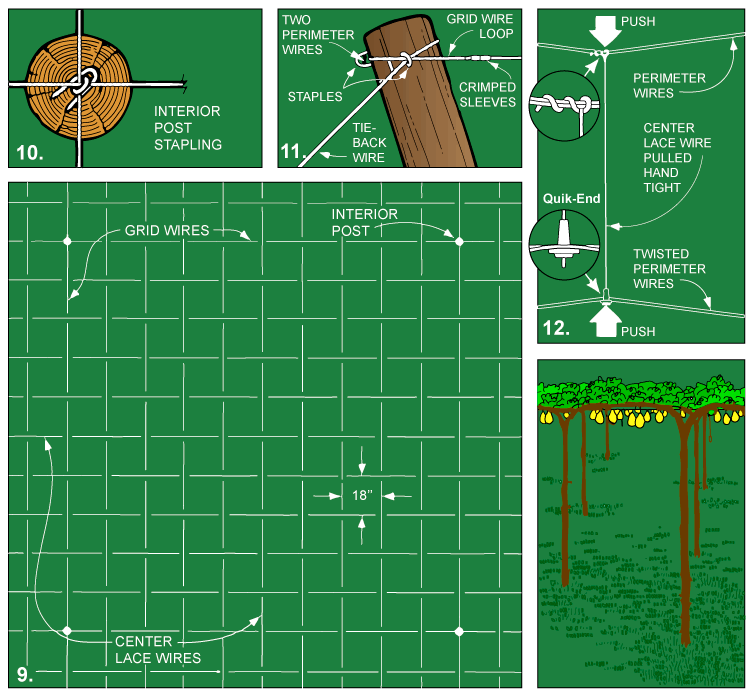
- Staple these grid wires to each side of all perimeter posts. (Drawing 11).
- Raise all grid wires to the top surfaces of the interior posts and staple as shown in Drawing 10.
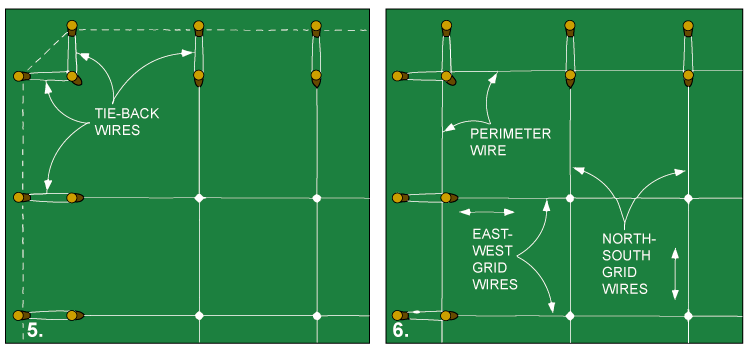
- Attach a one-wrap tie-back wire between the top of each corner and perimeter post, and the tie-back post behind it (Drawing 5).
- Install the tie-back wires through the same staples used for the grid wires (Step 11).
- Use a Chain Grab to apply tension to the tie-back wire and crimp the ends together with sleeves.
NOTE: If a trellis height of 6' is required, drive all posts 6" deeper into the soil. - Relieve tension on the guide wire around the tie-back posts. Relocate it near the top of each perimeter post (Drawing 6), so it becomes one of the two perimeter wires.
- Staple this wire to the outside of each post at the same height as the grid wire.
- Remove the Wire Puller from the perimeter wire and install a Wire Strainer. If the total length is 1,000 feet or less, install one Strainer in one side of the trellis; if the wire is up to 4,000 feet long, install two Strainers (on opposite sides of the trellis); if the wire is up to 8,000 feet long, install four Strainers (one on each side of the trellis).
- Thread a second perimeter wire through the staples holding the first one. Install a Strainer in this wire as described in Step 16. Tension both wires to 250 pounds.
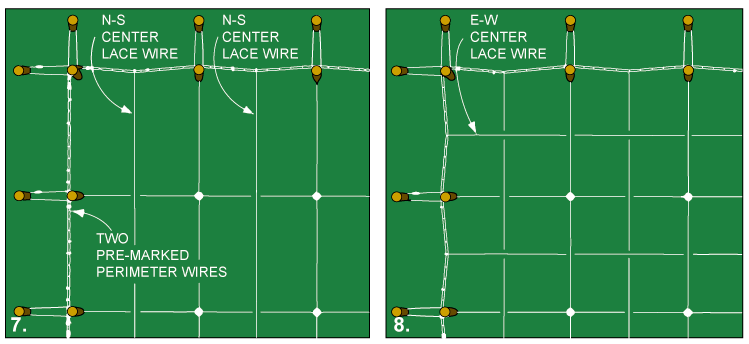
NOTE: If the perimeter is 8,000 feet or longer, three wires may be needed. - Pre-mark the perimeter wires with the desired spacings of the lace wires (Drawing 7).
- Pay out all North-South center lace wires, going over all East-West grid wires (Drawing 7). ("North-South" and "East-West" are for illustration purposes only.)
- Using the knot shown in Drawing 12, tie the center lace wire to the mark on the perimeter wire at one side of the trellis.
- As a helper pushes the opposite perimeter wire toward you, insert a Quick-End between your two perimeter wires (Drawing 12) twist it one revolution and thread the lace wire through the Quick-End from the small end. Push your perimeter wire toward your helper and pull the lace wire to a tension of 100 to 150 pounds, then cut surplus lace wire off 3" from the perimeter wire.
NOTE: For each alternate lace wire, the Quick-End is rotated the opposite way. - Repeat Step 19 for all East-West center lace wires, so they run over the North-South center lace wires, and under the North-South grid wires (Drawing 8). To pay out wires, place the Spinning Jenny on a vehicle that can move along the trellis perimeter.
NOTE: Plan ahead of Steps S and T so that all lace wires run over and under all intersecting wires (Drawing 9). - From the center lace wire outward, repeat Steps 19 and 20. For uniform tension, attach pairs of lace wires in both N-S and E-W directions. Attach adjacent pairs until lacing is completed. Be sure all lace wires run over and under intersecting wires (Drawing 9).
TABLE 9: Minimum Wire and Post Requirements for Typical Plantings-Horizontal Grid Trellises
Planting |
Posts* |
Wire |
|||||||
Interior |
Perimeter |
Corner |
Grid Spacing |
Lace Spacing |
Perimeter Wires |
||||
Size |
Driven |
Size |
Driven |
Size |
Driven |
||||
Apples |
8'-9'x3" |
1 1/2'-3' |
10'x4" |
3'3" |
10'x5" |
3' |
15'-20' |
18" |
2 |
Pears |
8'-9'x3" |
1 1/2'-2 1/2' |
10'x4" |
3'3" |
10'x5" |
3' |
15'-20' |
18" |
2 |
Kiwifruit |
9'x4" |
2 1/2' |
10'x5" |
3'3" |
10'x6" |
4' |
12'-20' |
24"-36"** |
4+ |
Grapes |
9'x4" |
2 1/2' |
10'x5" |
3'3" |
10'x6" |
4' |
10'-15' |
12"-18" |
2-4 |
* In heavy frost zones, and in soft soils, increase post length and driving depth by 1 ft.
** For kiwifruit trellises, lace wires can run in one direction only. See the kiwifruit horizontal grid trellis described on page 43.
+ Kiwifruit requires 4 wires per side on two sides only.
GENERAL SPECIFICATIONS FOR A TYPICAL HORIZONTAL GRID TRELLIS
- Wire height above ground: 78"
- For post dimensions and wire spacing: see Table 9
- Wire: MAX-TEN 200 High-Tensile Fence Wire
- Minimum wire tension: perimeter and grid wires: 250 lbs. per wire; lace wires: 100 to 150 lbs.
- Staples: 1 3/4 " galvanized, slash-cut points
- Tension devices: one In-Line Wire Strainer for each perimeter and grid wire
- Tension Indicator Spring: (optional)
- Wire splices: three crimped Kencove Sleeves, or one Quick-Splice, or a figure 8 knot
- Tie-back wire fasteners: two crimped Sleeves, end post knot, or Quick-End
- Lace wire fasteners: one Quick-End each North-South and East-West wire.
- Grounding (for dry soil, one ground rod per each 5625 square feet of trellis area; moist soil, one per each 11,250 square feet of trellis area). Needed for each grounding location:
- Ground rod (6' length of 1/2" galvanized steel rod, or 3/4" galvanized new steel pipe, or 5/8" galvanized steel rod). (Ground clamp - one per rod)
- Grounding wires: five 8' lengths of MAX-TEN 200 High-Tensile Fence Wire at each grounding location
An excerpt from How To Build Orchard and Vineyard Trellises - 47 pages of detailed instructions for using Max-Ten high-tensile trellis wire for a stronger, longer-lasting support system. Free shipping on this great how-to book for trellis design and construction.


